Featured 1

Curabitur et lectus vitae purus tincidunt laoreet sit amet ac ipsum. Proin tincidunt mattis nisi a scelerisque. Aliquam placerat dapibus eros non ullamcorper. Integer interdum ullamcorper venenatis. Pellentesque habitant morbi tristique senectus et netus et malesuada fames ac turpis egestas.

Featured 2

Curabitur et lectus vitae purus tincidunt laoreet sit amet ac ipsum. Proin tincidunt mattis nisi a scelerisque. Aliquam placerat dapibus eros non ullamcorper. Integer interdum ullamcorper venenatis. Pellentesque habitant morbi tristique senectus et netus et malesuada fames ac turpis egestas.

Featured 3

Curabitur et lectus vitae purus tincidunt laoreet sit amet ac ipsum. Proin tincidunt mattis nisi a scelerisque. Aliquam placerat dapibus eros non ullamcorper. Integer interdum ullamcorper venenatis. Pellentesque habitant morbi tristique senectus et netus et malesuada fames ac turpis egestas.

Featured 4

Curabitur et lectus vitae purus tincidunt laoreet sit amet ac ipsum. Proin tincidunt mattis nisi a scelerisque. Aliquam placerat dapibus eros non ullamcorper. Integer interdum ullamcorper venenatis. Pellentesque habitant morbi tristique senectus et netus et malesuada fames ac turpis egestas.

Featured 5

Curabitur et lectus vitae purus tincidunt laoreet sit amet ac ipsum. Proin tincidunt mattis nisi a scelerisque. Aliquam placerat dapibus eros non ullamcorper. Integer interdum ullamcorper venenatis. Pellentesque habitant morbi tristique senectus et netus et malesuada fames ac turpis egestas.

Translate

Showing posts with label winter. Show all posts

Wednesday, January 25, 2012

Healthy Crunch: Windowsill Sprouts are easy to grow!

In case you missed the article in the January/February Mansfield Magazine:

Sprouts are turning up everywhere - from wheat grass shots in our smoothies, to micro greens on posh servings at upscale restaurants, and in Essene bread in our local grocers' freezer. Once the domain of bohemians and hippies, these nutrient packed gems are no longer limited to 'bean sprouts' or 'alfalfa sprouts' in health food stores; packaged varieties ranging from mustard to radish and clover are now commonplace in the average grocery produce mart.


It is no wonder sprouts are so popular - they contain high levels of disease-preventing phytochemicals, as well as significant amounts of vitamins A, C and D. They are recognized by nutrition conscious consumers and health care professionals as a "super food”, and major organizations - including the National Institute of Health, American Cancer Society and Johns Hopkins University - have reinforced the benefits of sprouts with studies to validate these claims. The greatest reason to enjoy sprouts as a regular treat in salads or side dishes, on pizzas, or in breads is simple though: they are delicious!

Sprouts are best served absolutely fresh, and the easiest (and most economical) way to guarantee the very freshest of ingredients is to grow your own. When winter nights are long and days are cold, and you find yourself craving some healthy homegrown 'crunch', make a simple sprouter from an old canning jar and some screen; add seeds, rinse, then eat! You can order seeds to sprout (pick organic and/or untreated) such as alfalfa, mustard, broccoli, radish, or cress, or start with whole grains or legumes found in the bulk section of a natural foods store: mung beans, lentils, peas, wheat, spelt or quinoa are all easy to start.


You will need:
A one quart canning jar with a ring
Scraps of clean screen material
Seeds to start: between 1 Tablespoon and 1/8 cup per jar (rule of thumb: the smaller the seed, the fewer you need)


Instructions:
Trace the lid of a canning jar onto a scrap of clean screen and cut to fit inside the ring. Add a conservative amount of seeds to the jar (they expand with water and grow!), then secure the screen and ring by tightening it firmly over the opening. Fill the jar half way with water and allow the seeds to soak at least four hours, then drain and rinse. Keep the jar on your kitchen windowsill and rinse the seeds frequently, even after they begin to geminate. Be sure to drain the jar well after each rinse. In a few days you will see signs of sprouting. For greener sprouts, allow more sun exposure; for juicy, pale sprouts, keep the sprouter someplace dark.


Experiment with eating your sprouts at different stages of development, or trying them baked into breads. Sprouts are also wonderful in stir fry recipes or in soups. Our family's favorite: breakfast burritos with both spicy mustard and crunchy mung bean sprouts! Enjoy this healthy revolution: your body – and taste buds – are sure to thank you for joining in!

Friday, December 2, 2011

Garlic!

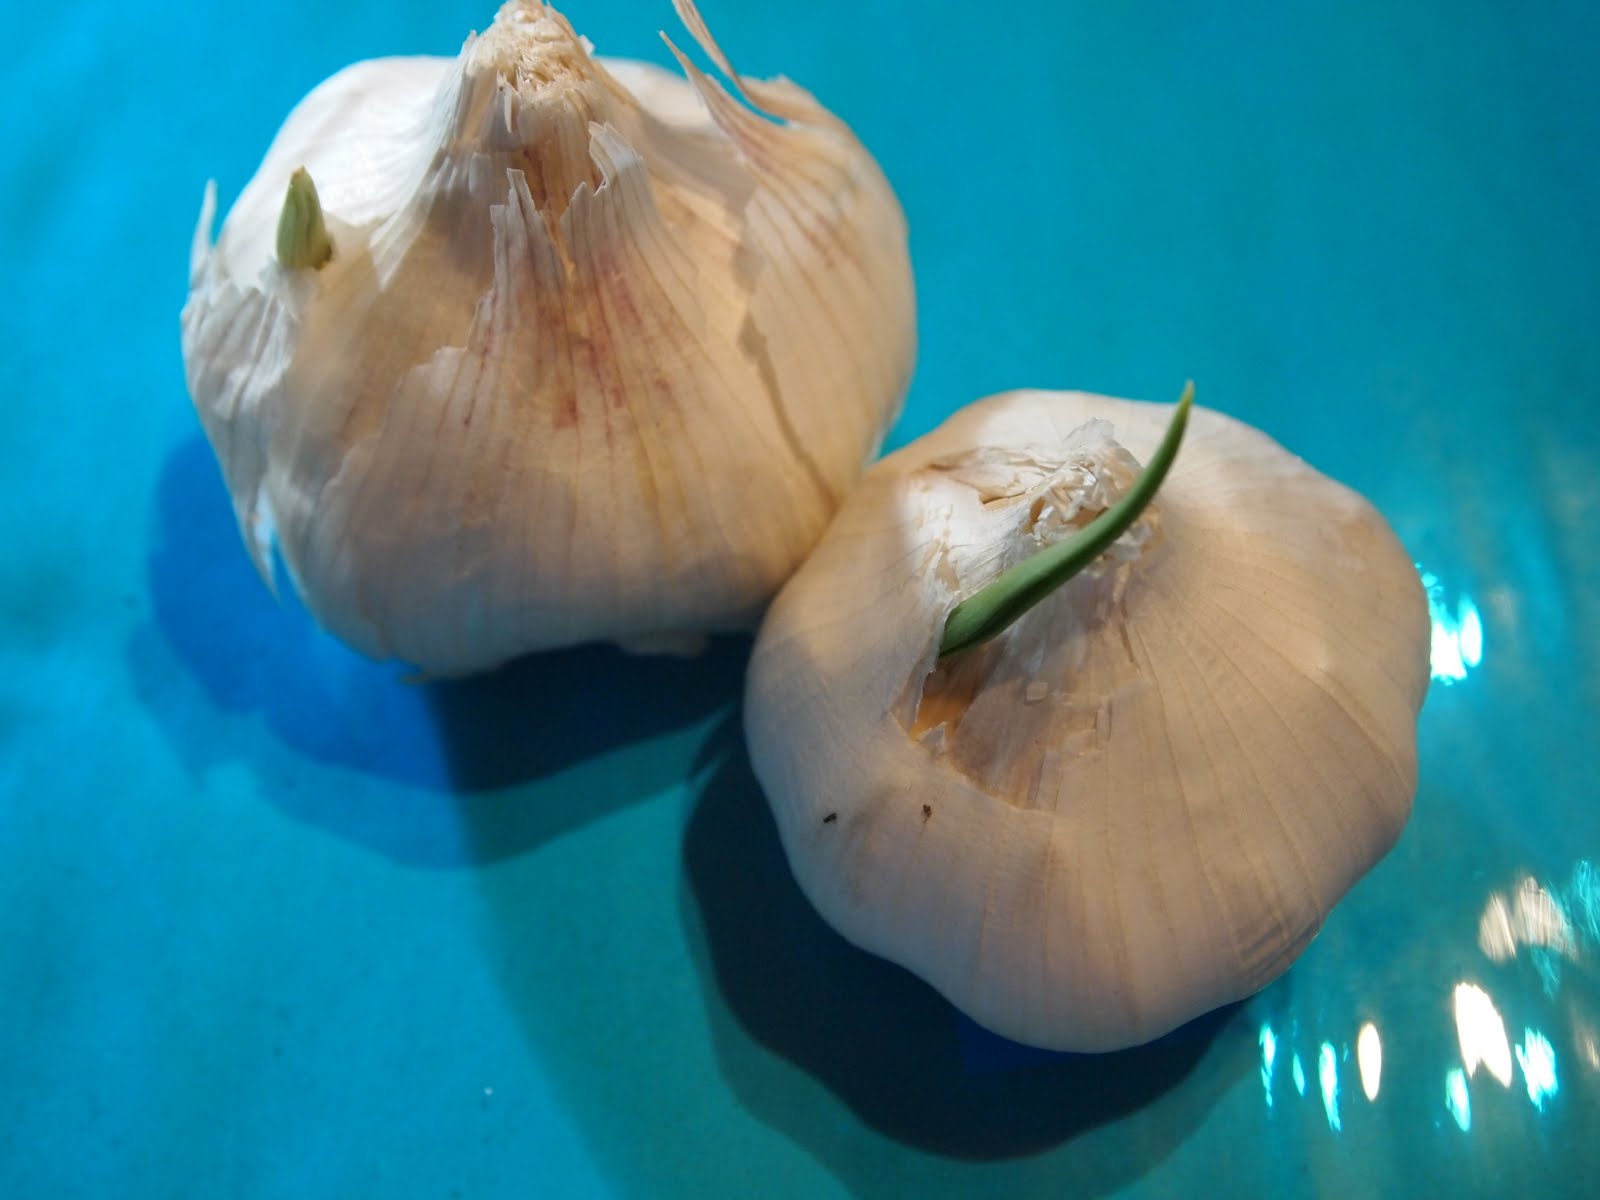
Garlic may be the perfect winter crop. Even north of Texas, it can be planted as long as the ground is still workable in the late fall - experts even recommend waiting until AFTER the first frost to poke your little cloves in the dirt. Start with fresh bulbs of ORGANIC garlic. Be sure you get organic, or the bulbs may be treated with growth inhibitors that prevent them from sprouting. This is convenient for grocery stores, but will mean no sprouting in ze garden for you! The bulbs below are organic cloves grown in California...obviously, NO growth inhibitors... Separate bulbs into individual cloves. You don't have to be fussy or get all of the paper off. It is best to soak the bulbs for 4-12 hours in a dilute mixture of fish emulsion and baking soda. This will help prevent fungal infections in the soil while things get revved up and germinating...


We tried a wee garlic experiment this year: half of the crop was organic garlic grown in Cali that we bought at the local market, the other half was purchased at a local garden center for the purpose of raising a crop. We shall see:)


Here is the pre-soak - yes, it is a smelly mess but worth it~


Poke coves in garden beds about .5 - 1 inch under the ground. I (finally, blessedly!!) have loose soil, so I go closer to 1 inch or critters tend to dig at the fresh cloves... In about two weeks, sprouts look like what you see in the photo above, especially if you are still having warm, sunny daytime temperatures...This is why mid-November is ideal here in North Texas.


Even through all but the harshest of winter days, garlic will take a beating. If heavy and prolonged ice or super low temperatures and wind chill is expected, then a covering of light straw is good for the shoots...


In Late April, pull a few stalks up and wala~ whole, juicy, sweet garlic bulbs will have formed. As a well known medicinal plant, garlic will help your body fight infection naturally! Less imported foods right from the garden, less medicine, it ALL equals Guard'n the Planet~ GO TEAM~!!


ps, the tender green shoots are to die for in any recipe that calls for green onions or chives~~~! pss, you will never have to worry about vampires again:)


Saturday, May 14, 2011

Growing Garlic

We harvested the first bulb of garlic last weekend: what a wonderful Mother's Day gift from the garden!


Pictured Left: "Fresh from the earth", a massive bulb has gently been eased out of the bed it has rested in for the last 5 months.

It was a much easier project than I expected (but of course, I had no idea what to expect!)


We purchased 5 bulbs of ORGANIC garlic from the grocery store, looking specifically for the 'locally grown' label. This is important for two reasons: organic garlic will not have any growth inhibitors sprayed on it (so it doesn't sprout in the grocery store) and the 'local' label means it is a variety suited for our area...


The bulbs were separated into individual cloves. No need to undo all the papery wrappings...and soaked for three hours in a bowl of water containing a splash of fish emulsion (from the garden supply center) and a teaspoon of baking soda (to help ward off any fungal diseases).


November 10: Cloves were poked into the bed of loose, well draining soil about an inch under the ground with their 'pointy sides' facing up.


That was it! a little water during dry spells and nothing else had to be done... The young garlic sprouts are edible the way fresh spring onion greens can be...and it was a trooper through our very cold Texas winter this year. We will definitely be planting more again next fall !!

In the mean time, fresh garlic will be for sale at ze Farmer's Market this spring!! We start next Saturday, May 21, at 7am near the corner of Broad and Main in Historic Mansfield... See you there!

Wednesday, February 9, 2011

Winter Gardening

Hands down, the most beautiful photographs of a winter garden are found at The Gardener's Eden. Clearly, Michela is a more experienced garden designer and author than I, having done freelance writing and photography for the mighty Martha Stewert. Michela's grasses, particularly, have amazing sculptural structure.

The picture at right, yoinked from The Gardener's Eden site, shows winter scene to die for: the three cardinal evergreen colors (green, deep red, and pale green/yellow) are perfectly balanced by the simple and strong gray of the concrete. Even her use of concrete is flawless, with natural, organic forms (steps) contrasted by geometric (bowl).

I am filled with envy.
Winter is a gray and dreary time for gardeners, and a season when productivity slows substantially - if not altogether -for food crops. If you live in an area with mild winter temperatures (zone 7 or warmer), then winter production may still continue by careful plant selection and the use of floating row covers. Here in North Texas, we continue to grow chard, garlic, onion, sorrel, burnet, rosemary and sage all year 'round.

left: chard, a winter survivor great for stew and soups...

For gardeners in more northern environments, winter is a good time to focus on the 'architecture' of the garden: evergreens, sculpture and other accessory elements, as well as gardening for the birds and wildlife. (Link here for more information on gardening for the birds .)

right: monochrome magic: simple concrete sculpture in our winter garden at Forgotten Works. The concrete was literally a road side find, shaped with a jackhammer...

Sculptural elements in the landscape can also add interest, especially in the deep of winter when everything may be shades of white, gray and brown. Some pieces combine function with beauty, while others exist only for ornament. When investing in art for your garden, go with a piece you love. Look for durable materials such as steel, concrete, or porcelain. Glass is durable, but can be subject to breaking during temperature extremes; be sure glass vessels are overturned so they don't hold ice and crack.

Don't let winter ruin your garden fun: if all else fails and it is just to cold, winter is the perfect time for scanning favorite garden catalogs and seed suppliers sites! Sstay by the fire and dream:)

Wednesday, February 2, 2011

Sculpture and Sky

Garden Sculpture tends to be small in stature: little creatures on the ground, saints and angels, gazing balls and bird baths...

But I like to look at my art where I tend to need it the most here in Texas: against the vast, unbroken sky. No sense adding to more confusion on the ground amidst the plants with all of their colors, the soils, and all of the mulchy textures of leaves, barks, and other debris.
Right: Steel bubbles reach for infinity. This piece is about 7 or 8 feet tall, and is made of cast off pipe fittings from the gas wells down the road. It does have a sturdy base, and could serve as a trellis for a climbing rose or a vine, or, um, a poolside towel rack;) Done for Heather Buckley by Forgotten Works Garden Gallery

For the Gallery Page, click here


The beauty of working with steel is the height and architectural whimsey that can be achieved because of its strength.

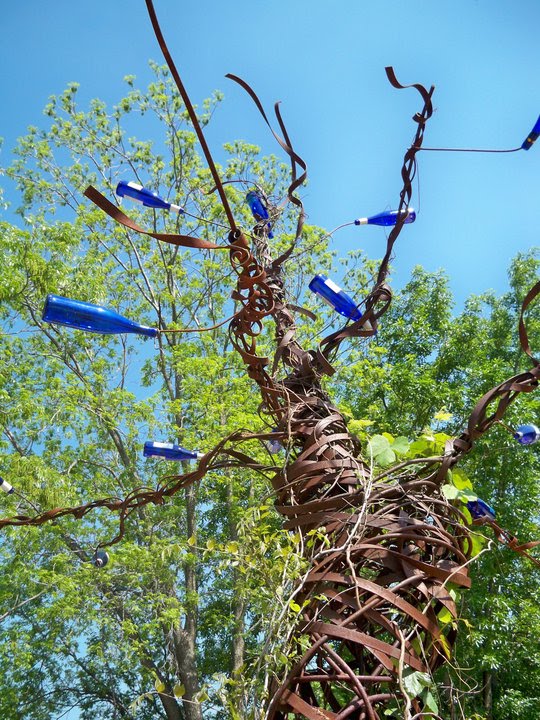
Left: "Tupelo" is our 20 foot steel bottle tree positioned in the center of the drive, setting the tone for our Bohemian Backyard Homestead and the whole recycled theme. It is also where cobalt Reislings go to die.


Grapes and a Wisteria climb the twisted steel trunk, and by August the sculpture is just the skeleton and a trellis for these aggressive vines. Wild Morning Glories have also taken seed, assuring us that the whole piece is but a dripping green form by summers end.


Right: "Blue Dharma" uses rings, but this time instead of pipe fittings, asymmetrical circles have been cut from a scrapped piece of steel sheet metel. Powder coated in cobalt, it reflects and repeats the blue of our frequently-used-bottles.

This is one of three pieces in our 'planetary' series. A red sculpture, still available, is similar in size and stature, and sits near our homestead entry. The orange piece, third in the series, was sold in 2009.


Today is the coldest day in February, and I can't even think about looking outside. "Bleak", "Gray", "Boring", and, dare I say it, "DEAD" come to mind. Even the evergreens look tired and cold. When we talk about adding 'winter interest' to the garden, often my first reaction is 'YEAH, RIGHT'. Days like today make my garden sculptures more important than ever.

Left: The cobalt bottles on "Tupelo" are even more welcoming when set against the dreary sky of winter...

Visit us at Forgotten Works to find more of our 'modern organic' designs for the garden.

Friday, October 1, 2010

Recieve a Head Start and Begin Preparing for Winter Now!

Recieve a head start and begin preparing for winter now!
Home Inspection tips to prepare For winter

By: House Detective Inc. Home Inspections and Appraisals


Tempetures are beginning to drop and it is important to make sure your home is weatherized to keep you comfortable and your energy bills down. Here are some highlighted home inspection tips to check out before it gets too cold.
I know, I know - the fall season has just begun. However, now is the time to get your home ready for winter. Winter can be brutal regardless of where you live in the county. Here are just a few small home inspection tips to keep you warm and safe.

Home Inspection Winter Checklist

1. Have your heating system checked now. Have a professional perform a maintenance routine on your system to make sure it is running in top condition.

2. Change your air filters throughout the house. This should be done in regular intervals throughout the year. Fall is a good time to check them.

3. Have a professional chimney sweeper perform routine maintenance and have your chimney cleaned.

4. Replace the warm weather screens with storm windows. This will add another layer of insulation during the cold months.

5. Check all the windows and doors. Make sure they are working properly and have tight seals.

6. Check the plumbing fixtures. Make sure there are no gaps between the fixture and the wall.

7. Clean out the gutters and downspouts. This will prevent excess build up.

8. Check under the house plumbing. If you have a crawl space make sure there is adequate insulation.

9. Check the attic space. Be sure there is no insulation covering the vents

10. If you have ceiling fans, reverse their direction for winter months.


For all your Home Inspection needs contact House Detective


Related Posts Plugin for WordPress, Blogger...